Showing posts with label I Drew This. Show all posts

Wednesday, July 30, 2025

CAM Commissions Completed

As I mentioned last week, I signed up to do art commissions to support the Cartoon Art Museum in San Francisco while Comic-Con International was raging in San Diego. In exchange for a donation, people could ask the artist of their choice to draw pretty much whatever they wanted. I've done it before, always enjoyed the variety and challenge, and this year was no different!

I wanted to share three of them. The commissioner of the fourth one wants to keep it private. All are done in ink and colored pencil on cardstock. These will be off to their new homes and owners in a couple of days.

Little John requested "Captain Marvel (Original Big Red Cheese)". There have been many characters called Captain Marvel over the years, including the most recent played by Brie Larson, but this is the original real deal who sometimes goes by the name "Shazam!" (for complicated historical legal reasons). I had fun drawing the lightning. 


The requester asked for "a gargoyle." I emailed back to ask what she had in mind: a character from the old "Gargoyles" cartoon show? Disney's "Hunchback of Notre Dame?" Any particular cathedral or era? She sent me back a photo of a concrete statue in her yard that resembled a traditional Asian dragon, so that was my inspiration. 

Heather asked for "Powerpuff Girls or artist's similar choice of (non-sexualized) female superhero." No alternative choice necessary because I love the Powerpuff Girls and have been drawing them since my daughters were little! The Powerpuff Girls are kind of like "Peanuts" characters in that their designs look very simple but you have to get them just right or they look completely wrong. Deceptively hard to draw, especially while trying to impart a little style of my own. 

These were all a hoot, and each stretched different art muscles. I don't otherwise do commissions, but I've always been happy to raise a few bucks for CAM, a fine institution of culture and scholarship. If you ever visit the San Francisco waterfront near Ghirardelli Square, drop in and tell 'em I sent you. They won't give you a discount or anything, but word might get back to me and it'd make my day.

Thursday, February 23, 2023

Rocketeering

My friends at the Cartoon Art Museum are holding an art auction this spring to celebrate the wonderful comic book (and Disney film but we're not talking about that) The Rocketeer and its creator, Dave Stevens. You may recall a similar auction three years ago featuring many cartoonists' tributes to Calvin & Hobbes. CAM is doing the auction in concert with an exhibition of Stevens's artwork this summer, and proceeds will go to both CAM and research on hairy-cell leukemia, from which Stevens died at the age of 52. 

And I get to contribute!

It occurred to me that this might make a good "process post" about how I make a comic, keeping in mind that this project is different from how I usually work. I'll point out how as I go.

The Rocketeer is an action-adventure story set in the Art Deco 1930s. Stevens mixed real-life people and places with his tales of barnstorming pilot Cliff Secord, who zips through the sky with a rocket on his back righting wrongs. Cliff is a young, dashing but reluctant hero, perfectly played in the movie by Billy Campbell. I joked about the 1991 Disney movie earlier; CAM told me that we had the Stevens family's blessing but not Disney's, so we could use material from the comics but not the film. Luckily, the film is such a close copy of the comics that almost everything in it showed up in the comics first.

As the guy who wrote two graphic novels called Whatever Happened to the World of Tomorrow? and The Last Mechanical Monster, I thought this was right up my alley.

My first idea was to draw something tall and skinny, so I could show the Rocketeer blasting into the sky. I did this VERY small thumbnail on a sticky note just to check the proportions and composition. That's the only preliminary sketch I did.

It ain't much, but it did the job.

I drew on a piece of watercolor paper 1 foot wide and 3 feet tall. I don't have a drawing board that big, but I do have scrap pieces of wood left over from a bookshelf project, so I taped the paper onto that and began penciling, to be followed by inking over the pencil lines.

Watercolor paper taped to a melamine board, with the border lightly penciled.

In most of my comics work, I pencil with light "non-photo" blue pencil that readily disappears when it's scanned. That way I don't have to erase and risk dulling or smearing the ink. But since this is meant to be a finished piece of art that someone might want to hang on a wall, I penciled with a regular ol' Number 2 that I would erase once I inked over it.

Using reference to pencil the Bulldog Cafe, which was a real place in Los Angeles that Dave Stevens used in his Rocketeer comic book, as on the page at top left. I added palm trees because that says "L.A." to me.

The little man in the drawing is Cliff's mechanic buddy Peevy. The woman--well, that's a digression. In the comics, Stevens used the real-life pin-up model Bettie Page as the direct inspiration for Cliff's girlfriend, Betty, but that wasn't going to fly in a Disney film for more than one reason. In the movie her name is Jenny and she's played more demurely by Jennifer Connelly. My heroine isn't dressed like Betty, Bettie, or Jenny--I googled "1930s fashion" and picked a pretty dress--but she has Betty/Bettie's trademark bangs and jet-black hair.

After penciling the whole thing, I inked it using a brush and India ink, brush pens, and Micron pens, then gently erased my pencil lines with a soft kneaded eraser.

Inked.

I don't like making comics on watercolor paper. In fact, I recently had a bad and time-wasting experience with it. It's just not the right medium for fine ink lines. The standard paper for cartooning is Bristol board, which is like a real nice cardstock. But I went with it on this project because I planned to watercolor the picture, and Bristol board is lousy for watercolors. 

Watercoloring in progress. At top is a sheet I made showing what many of my watercolors actually look like on paper, which is important to know! The black plastic tray is to contain the paint and water in case I knock over the cup. (For the same reason, I keep my bottle of India ink in a ceramic potted-plant saucer. You don't make that mistake twice!) 

After I finished watercoloring, I let it dry a bit and then scanned it so CAM could see what I was burdening them with. Since this is the scan that'll also advertise the eventual auction on eBay, I hardly fiddled with it at all, as I might with something meant for publication. What you see is what you'll get.

Peevy, Betty (?), and the Bulldog. I don't know why "Tamale" is singular, but it was like that on the actual cafe. Maybe they only had one.

Cliff and a wingman. BTW, the airplane is also historically accurate, a whimsical design called a "Gee Bee" that Stevens loved and used in his comic.


Done! Now I'll just give it a while to thoroughly dry before getting it to CAM. Somehow.

And that's pretty much it! Start to finish, the whole thing might have taken me six or seven hours spread over two days, though some of that time was spent literally watching paint dry.

I'm gratified that I can do something unique to support a great museum and pay tribute to a comics creator who did terrific work and died far too young. There's also something satisfying in starting with a blank sheet of paper and in a few hours creating something that never existed before and nobody but me could have done in quite the same way. I always like that.

I'll be sure to shout out when the CAM auctions begin, and shout louder when mine goes on the block. Happy to answer any questions in the comments.

Wednesday, July 31, 2013

The Kid

Nothing profound today, I just wanted to post some drawings of the Cosmic Kid I did recently for a little side project (not the Scholastic edition--I'm told that's already off to the printer!).


I really enjoy drawing this character--unlike Cap Crater, whom I enjoy drawing less because I made some--well, I don't want to say "poor decisions," but let's say "less than optimal choices"--when I designed him. The Cosmic Kid is always expressive, energetic, and has different shapes and textures in his uniform for me to play with. I like drawing his gray undershirt and leather boots. I like drawing his Saturn emblem. It's always fun to revisit him.

WHTTWOT was recent enough that I can always dash off a Cap Crater or Cosmic Kid without reference. If I had to draw any other characters from the book, I'd probably take a quick look just to remind myself how I drew them. Sketching the characters from Mom's Cancer, as I recently did when signing books at the Medical Examinations Conference at UC Riverside, is more challenging both because I haven't drawn them in a while and I don't exactly draw like that anymore. No one else would notice the difference (I trust), but I kind of have to rewind my brain and think, "how would I have drawn them then?" In fact, embarrassing secret: before the Riverside signing I practiced so that I could casually dash off a sketch like it was no big thing. I worked at that.

There's another good reason to put a lot of thought and care into designing your comics characters: you may be living with them much longer than you think.

Thursday, July 25, 2013

How I Make Comics

In my mind I think I write "How To" posts all the time. If you looked through seven years of archives on both this blog and its predecessor, you'd probably find dozens of them. However, I recently realized it's actually been a long time since I've described my overall cartooning process in any detail, and it's evolved a bit. So once more unto the breach.

First Critical Caveat: This is just my way. It's not the right way. There is no right way; whatever tools and methods work for you are fine with me. In fact, in our digital age in which increasing numbers of cartoonists work entirely in pixels on Wacom tablets and Intuos screens, my dedication to paper and ink makes me a dinosaur in denial that an asteroid has hit. My answer is the same as MAD Magazine cartoonist Tom Richmond's: paper and ink are fun. I enjoy the craft of creating a physical thing. Why would I give up the best part of the job?

What I can testify is that I've made a lot of mistakes, massaged out a lot of bugs, and this method works for producing publication-ready comic art. Revise the recipe to suit your taste.

My paper is 2-ply Bristol board, typically from Strathmore. For this project, my original page size is 27 x 42 cm (about 10.5 x 16.5 inches). Most artists draw 1.5 to 2 times larger than their comics' ultimate printed size, which in this case I don't know; I chose that size because its proportions are standard and it's the largest that fits on my scanner. My India ink is Dr. Ph. Martin's "Black Star." I used to use Higgins ink, but either their formula changed or my standards improved, because I find it unusable now. Too thin and blotchy. Martin's costs more but it's got a great consistency and covers paper like tar covers a road.

I typically write my comics first. It's an informal script, but in form and content resembles a screenplay: simple descriptions of settings and action, plus dialog. Sometimes a little doodle to remind me what I'm imagining. Not everyone scripts first. Some savants just start drawing and see what story comes out. I can't do that and barely comprehend it, but if you're a "pictures first" type of cartoonist you have my respect and admiration.

I'll often but not always do thumbnails--very rough sketches that lay out the page and the action in each panel. Sometimes the script is clear enough that I already see the page in my head and can go straight from script to penciling.

Pencils and Inks
Comics are traditionally drawn in pencil first, then gone over with black ink. This method is an artifact of century-old printing technology and isn't really necessary anymore, but it still works and is what I do. You can just use a plain ol' No. 2 graphite pencil, but you'll have to erase your lines later. I don't like to erase. It takes time and smudges ink lines. Instead, I use light blue pencil, another artifact of obsolete technology. In the old days of shooting Photostats, light blue became invisible so you didn't need to erase it. Even today, scanners and photocopiers don't reproduce it well, so it can still serve much the same purpose.

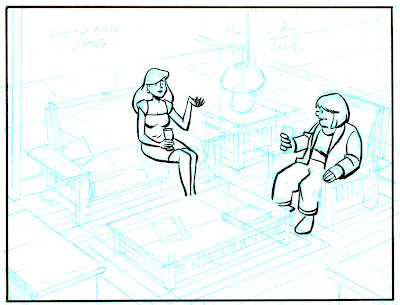
Here are my pencils for one panel of a comic I'm working on. I had to crank up the contrast very high to see the blue lines at all:


In this panel, two neighbors are having a glass of wine after work. First thing I want to point out, and this is very important: my top priority when composing a panel is figuring out where the words go. A lot of beginning cartoonists don't know this: THE WORDS GO FIRST. Blocks of text draw the reader's eye through the page, and their placement can make the reading experience an effortless joy or a hopeless muddle. It's not evident in the above scan, but I've sketched out a few key words from the script in the open space near the top of the panel (the one at top left reads "good old days") and am very aware of how much space the text will need.

Second thing I want to point out are the perspective lines. They all go toward two vanishing points far off-panel (actually, far off the edge of the paper as well). I don't lay out a perspective grid for every panel, but in this case--a medium-long shot that shows walls, a floor, furniture, and characters occupying that space--it's essential. Whenever I have trouble drawing something and it just isn't "working," I find that about half the time I've messed up my perspective somehow.

Next step: inking. In the old days, the words would be lettered on the page before anything else; that's how important they are. These days, I letter digitally near the end of the process (for reasons I'll explain later). As much as possible, I ink with a brush. Brushes take some practice but to me are worth it for the life they give a drawing. I use a "00" (double-zero) brush, which I understand is smaller than most cartoonists prefer, but I like the razor-thin line and fine control it gives me. Here I've drawn the panel border and inked the figures:


This panel is unusual in that I brushed very little of it. Generally I ink at least half of every page via brush, but this panel has a lot of fine straight lines that'll obviously require a pen. Sometimes I use a crow-quill dip pen, but in this case I'll use Pigma Micron pens in various sizes to complete the inking (I'm not a shill for Microns, but they make dark, colorfast lines that work well). Here's an intermediate step, in which I've defined the major shapes to make sure they're right before getting bogged down in fiddly bits.


Then the fiddly bits:


At last I join the 21st Century and scan the art into Photoshop. First step is general clean-up: smudges, smears, and other stuff that would've been fixed with white paint and rubber cement in the old days. I think you have to be very careful here. On a computer, it's very easy to zoom in on every microscopic spot and "fix" it until you've fixed all the spontaneity and life out of it. In my opinion, it's vital that the art still looks like it was done by a human rather than a robot. Know when to quit. At this point, I also use Photoshop to erase my blue pencil lines.


Here's some wisdom I learned from hard experience, and led to the Second-Best Advice I Ever Gave: when you scan your work into Photoshop, scan it at the highest resolution your computer can handle without choking. At a minimum, 600 dpi. I work at 900 dpi, but that's with original art drawn larger than the final art will be printed at, so it's really more like 1200 dpi. One reason is that, even if you're just doing a webcomic that'll be posted online at 72 dpi, you may need better-quality images down the road. Remastering original art is a painful waste of time.

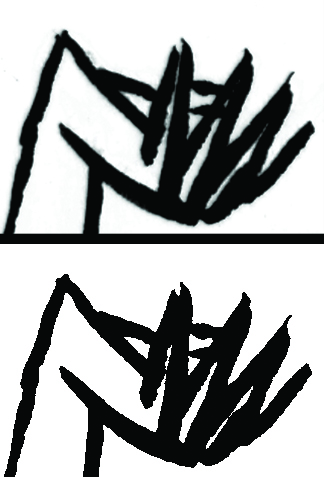
Here's another reason. At this stage, I do something that's hard to follow if you're not playing along (so don't worry if you're not): I convert my scan to bitmap (50% Threshold) and then back to CMYK mode. Why? Because converting to bitmap changes every pixel to either black or white--no grays. This gives me very crisp black lines that print and color very cleanly. As shown in the comparison below, where I've zoomed in to look at the hand of the woman on the sofa, it also gives lines a zig-zag sawtooth pattern. Scanning at high resolution makes the sawtooth disappear when you pull back.

Before (top) and after (bottom) converting back and forth to bitmap mode.

Now: Words. As I said, in the old days, the words would've been inked first, directly on the original art. That's how I did Mom's Cancer. That's real cartooning and I respect it. However, here's what I learned on Mom's Cancer: it also makes editing very difficult. Imagine you want to move a word balloon, change or delete a bit of dialog, or just fix a typo. With the text and balloons on the original art, you might have to redraw an entire panel. And that's not even considering deleting all the words to get the pages ready for foreign translations! With some regret, I decided that digital lettering was the way to go on Whatever Happened to the World of Tomorrow, and haven't looked back. I scanned samples of my own hand lettering from Mom's Cancer and used a program called FontCreator (not a plug, there are others) to turn them into a computer font, which I've used since. Balloons go on a separate Photoshop layer in a process that isn't worth describing. All easily editable.


Finally, Coloring. Again, in Photoshop*. There are some technical aspects of preparing art for color printing that aren't worth getting into. Most importantly, I recommend coloring your work in CMYK (cyan, magenta, yellow, black) mode rather than RGB (red, green, blue) mode because CMYK works best for printing inks on paper while RGB works best for shooting electrons at a computer monitor. Unless you're absolutely certain that your artwork will only ever be seen on a screen, use CMYK or brace for a world of hurt later.

(* I know quite a few artists who color their comics by hand using watercolors or what have you, including Vanessa Davis and Carol Tyler. I believe their pages are simply prepared for printing by photographing or scanning them, as you would any other piece of art. I think that's wonderful and has a lot of integrity. It's just not what I do . . . although I'd love to try it.)

So I colored this drawing just to show how it might look:


This coloring is quick and dirty, not final; if this panel ever sees print, it might look quite different. I would go to some effort to create a palette for every character and location (which I haven't done here) to give each a characteristic look and feel. My goal is to have the colors communicate something about the person and place, and lead your eye where I want you to look. A lot of colorists take full advantage of Photoshop to do highlights, shading, blending, and similar effects (lens flare!). I do some of that but not a lot. My comics aesthetic leans toward a limited palette of mostly flat colors. To me that says "comics." But that's just me.

That's pretty much how she goes. It may seem like there's a lot to it, but you get into a rhythm and it flows pretty easily. I enjoy the change of pace moving back and forth between the drawing board and computer. At the end of the day you can say you turned white paper and black ink into something that didn't exist yesterday, which can be a very gratifying (or frustrating or depressing or exhilarating) feeling.

Friday, April 12, 2013

I Drew This, Plus Scouting

I Drew This #2: An old man putting on pants.


This is about as exciting as "Mystery Project X" gets. I smell a bestseller.

* * *

I had a very nice time at the Charles M. Schulz Museum and Research Center last Sunday playing author for a special Girl Scout event. The theme of the day was "Storytelling" and Scouts of all ages came to do activities and earn badges built around it. About 140 girls spent several hours on the grounds, split into two groups so that half were ice skating at the nearby arena while the other half toured the museum.

I sat upstairs with Lauri Day and later Vicki Scott, both of whom I enjoyed getting to know a little (I'd met Vicki before but we'd never really talked). To help keep the younger Scouts on task, they were sent on a two-page scavenger hunt for information they had to find somewhere in the museum, including from Actual Storytellers. They had four questions for us. At first I responded with detailed replies as if I were actually being interviewed. I immediately realized that wouldn't work because a.) they weren't really interested, and b.) some of them could barely print. Our interactions quickly distilled down to the fewest, simplest words possible:

Q. What is your name? A. Brian Fies. You can copy it off my little sign here.

Q. Where do you get your ideas? A. I think about things that are important to me.

Q. How long does it take to write a story? A. A long time. About two years for my first book and three years for my second.

Q. What do you do when you don't have any ideas? A. I have too many ideas, not enough time. Alternative answer: I think harder.

Most of the Scouts were a blur of vests and braids, but some stood out. A few seemed genuinely interested in looking at my originals and learning about the cartooning process. One 8-year-old planted herself in front of my table and started reading Mom's Cancer. When her Mom said it was time to move on, she didn't budge. Finally the girl said, "I want to buy this book" (which I hadn't really brought any copies of to sell). Mom looked at the title, looked at me: "Is it age-appropriate?" Tough question; I answered honestly, "Maybe not." They moved on. But for a couple of minutes, I had her riveted.

Of course the museum was open to regular visitors while the Scouts toured. Among them was a group of nuns, which made an interesting contrast with the Scouts. Old and young women in different uniforms. Two boys, maybe 11 or 12, thought all of us cartoonist-types were just amazing. They kept circling around with such open, sincere enthusiasm I initially wondered if they were putting us on. And they caught me in a snare I'll be more careful to avoid next time.

As the afternoon went on and the Scouts thinned out, the boys asked Lauri and me if we'd race to see which of us could draw them faster. "OK, now you do him and you do me." That was a couple minutes of fun . . . which ominously did not go unnoticed. Another visitor saw what we were up to and wanted her kid's caricature. And in the time it took to do that one, someone else came up. So I spent the last half hour drawing caricatures over my strong and heartfelt protests that I'm not very good at it ("Oh, please, just one more of the little baby, we'll put it on her bedroom wall"). It was horrifying. Everyone seemed happy with their sketches but I'm not falling for that one again. At least no one asked me to draw Snoopy; Vicki does it for a living, but that beagle is harder to get right than he looks.

With that important lesson learned, it was a nice afternoon. The girls, visitors, and museum staff were great. Girl Scouts was a big part of our family's life for a long time (says the 2001 Father of the Year for Girl Scouts Service Unit #18), and in fact Karen's still involved seven years after our daughters earned their Gold Awards and moved on, so it was fun to reconnect. I can't think of any way to not make this sound super creepy, but I just love little girls. They always remind me of young fatherhood, a good time in my life, and the two former-little-girls I love most in the world.

Thursday, April 4, 2013

I Drew This

From time to time, mostly as a way of encouraging myself, I think I'll post a bit of something I've drawn recently. Maybe a panel, or even a little piece of a panel--something I'm happy with. Unless otherwise described, they're from Mystery Project X, and I'll be careful to avoid giving anything away. These're pre-Photoshop, pre-lettering, pre-coloring: raw stuff.

I drew this.